Showing posts with label adobe. Show all posts

Tuesday, 9 February 2016

Creative Thinking

In last weeks lecture we were thinking about Creative thinking and we looked at many toys and how they are all similar. Ie. like lego and kinex. We then were set a task to come up with a toy which is different to other popular toys.

Our group made up the company name called 'Barnsley's' and this brand sells toys usually vehicles which are bigger than usual toys but apart from you build the vehicle from scratch and it also has a working diesel engine that you have to build, this product was aimed at 16+

our group knuckled down and i had the task of designing the product and this what i designed on adobe Illustrator  

Thursday, 21 January 2016

Indesign - Tutorials

In one of the tutorial videos, they show how you can change the colour of your interface ranging from a light grey to a dark colour  you can also put in a percentage and that can allow you to choose what colour you want.

all of these short cuts make it a lot easier when using the software, this can help to make the work more simple and can also can make it quicker to complete your task.

The shortcuts are different compared to photoshop as the tools are used for different purposes.

Thursday, 10 December 2015

Patterns in photoshop - "Candy"

Firstly we started a page in photoshop that was 100 x 100 pixels and created the background transparent. We then set a rule i the middle of the page and created a new layer and placed a dark red rectangle and duplicated it twice and put it either side of the page. This Created the Pattern.

We then created a new file, with a plain white background then
used the text tool to apply the word Candy on to the page.
I then applied that pattern onto the text, then put a darker red as an outline, then added a  golden outer glow.


After i dome this a made the background the same pattern apart from i made it a light pink colour, then tilted the background slightly to make it the same angle as the text.


Thursday, 3 December 2015

X-mas Cards

I done this christmas card on Adobe Illustrator, Firstly i placed the background colour and i added the snow hill by drawing a shape with the pen tool, then drew the trees by inserting a triangle then narrowing it down and copying it many times and changed the colour of them to show the effect of shadows. I then drew the shadows of the trees, then inserted the text and coloured it with a yellow and orange gradient with a white stroke. i then drew a snowflake using the line tool and shrunk it down and copied it many times and changed the size. Then finally drew santa his slay and reindeers all by scratch using the pen tool
I done this card by using a text that would suit the christmas spirit then added a slant to it, then using the brush tool i imported some X-mas trees, i picked the one that i liked then applied it to the middle of the card

Tuesday, 1 December 2015

Animation - flash - popcorn

In todays lecture we looked at how popcorn in made and how we can make that effect on flash.
Firstly we started by creating a android app and made a circle and applied it to "Up" and "Over".
Then we made a different coloured one on the next frame "Down" and hit was the last frame which allowed us the range of where to click on the button.


We then did the same process apart from on the first two frames to pop corn unpopped, and the third frame it popping and the same process on the last frame.  After that Steve sent us some sound effects, i put in a booing sound so it made a noise when it is clicked

Thursday, 19 November 2015

Christmas Cards - Preliminary Photoshop Designs

In todays lecture we created preliminary designs for our christmas cards using photoshop.

We started by applying a gradient to the background, we did this by choosing the colour then using the gradient tool to create the effect, then placed a half colour gradient effect.
Afterwards we looked at filters, we chose the filter, noise and applied that to the page then turned it to around 30% - 40% to create the card effect instead of a solid boring colour.
 Once i done this i used the polygonal lasso tool to draw the triangle then coloured this triangle yellow, after that i changed the opacity of the triangle down to 50% so the ends of the triangle were faded out into the red background.
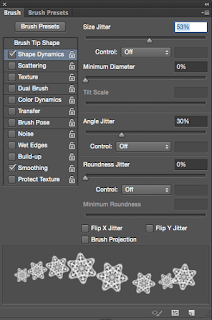


after that i installed a snowflake brush to use around and in the yellow triangle, we changed the size jitter so there was a variety of different sized snow flakes, we coloured them a lighter yellow and scattered them in and the outline of the triangle to make this.      \/   \/   \/   \/   \/   \/   \/   \/   \/   \/   \/   \/   \/   \/   \/   \/   \/   \/   \/   \/
i did the same to the white star and the plant pot and then i inserted text saying merry christmas then i put a white outline around the text. and then i was finished. this is the final product.


Thursday, 22 October 2015

Final Postcard

This is my final postcard design, i chose this as mt final design because i did alot of work and tweaked the filters alot to get the final outcome, i thought it would be a good final design as i liked the look of it, also it appeals to my target audience because of the layout and the colours used.

Short Film - Dark Knight


we started by finding a location around colllege, one we found where to film our short film, we set the camera up, after that me and shane started filming and started acting out certain scene from the film, Batman Dark Night, after that we
went back to the class room we edited the videos to create a story.

Wednesday, 14 October 2015

Bottle Vs Coffee Youtube clip/edit

Yesterday we went down the road to a open park where we got some shots from different camera angles and played around with the camera and got the shots that we wanted.

Then in todays lecture we got on the computers and opened Adobe Premiere and got editing all of the clips that we shot yesterday and started to put themtogether to make a clip. I started by cropping all of the clips that i was going to use and then i started to put them in order, after i did this i started to add in sound effects and started to mash it all together so i was left with the final piece. Lastly i inserted some text and some outro music to top it off.
after i had done all this i exported it and upoaded up to YouTube!

Start: coffe cup on its own on a bench, bottle comes along and they start arguing

Middle: they start fighting and graduly start hurting eachother

Lastly: the bottle wins.. il leave the suprise for you to watch!


Tuesday, 13 October 2015

Illustrator + infographics

In todays lecture we took part in some quizes and shown some imagination of our infographic designs, we were then called up to the front to have a look at some infographic surveys and a CV.
shortly after looking at this we opened Illustrator and had a look at some basic tools and getting to know the program itself

Thursday, 24 September 2015

Youtube Clip

Here is the link to my youtube video of some different camera angles with a slight twist at the end
The camera shots i used in the Outdoor shots are
  • Over The Shoulder (From both sides)
  • Wide Shot
 i added in a twist at the end of the clip, to show that I learnt how to add in text and sound effects and misic into a clip or short film etc. Also learnt about the 180 degree rule and how you have to keep in the 180 degrees and make sure that one actor stays on the left throughout the clip. Visa Versa.

I decided to use a wide shot so I could get the environment that the actors were in. Also i used over the shouder shot from both sides to get a cleare pictures of each actor.

We planned, flimed and edited this small clip in the 2 hour lesson that we had and finally upoaded it up to youtube

The link to the clip: https://www.youtube.com/channel/UClc41aKZdyHfuDWgugvL6-g